Battery switch on travel trailer function is crucial for managing your RV’s power. Understanding how to use your battery switch correctly is key to preventing dead batteries and ensuring your appliances work reliably. This guide will walk you through everything you need to know, from basic operation to troubleshooting common problems and performing maintenance.
We’ll cover different types of switches, wiring diagrams, and best practices for keeping your batteries healthy and your travel trailer running smoothly. Whether you’re a seasoned RVer or a newbie, this guide will equip you with the knowledge to confidently manage your travel trailer’s power system.
Understanding Battery Switch Functionality in Travel Trailers
Your travel trailer’s battery switch is a crucial component, acting as the central control for your trailer’s electrical system. It allows you to disconnect or connect your trailer’s batteries to the various electrical systems, preventing battery drain and protecting your equipment. Understanding its function and proper operation is essential for maintaining your trailer and preventing costly repairs.
Battery Switch Types, Battery switch on travel trailer function
Travel trailers utilize different types of battery switches to manage their power sources. The most common are single battery switches, which control a single battery bank, and dual battery switches, which allow independent control of two battery banks (often a house battery and a starting battery for the tow vehicle). Some more advanced systems incorporate multiple switches or integrated control panels for even more granular control.
Choosing the right type depends on your trailer’s setup and power needs. For example, a trailer with separate batteries for house power and engine starting would benefit from a dual battery switch.
Operating a Battery Switch
Proper operation of your battery switch is key to avoiding electrical issues and ensuring your batteries remain charged. The process generally involves a simple on/off mechanism, often with a series of positions. A typical dual battery switch might have three positions: “Off” (completely disconnecting both batteries), “Both” (connecting both batteries together), and “Start” (connecting only the starting battery to the trailer’s starting system).
Always refer to your specific switch’s instructions and diagrams, as designs can vary slightly between manufacturers.
- Identify the switch positions: Carefully examine the switch to understand the different positions (e.g., Off, Both, Start, Battery 1, Battery 2).
- Turn the switch to the desired position: Slowly and firmly rotate the switch to the position needed for your current use. For example, when storing your trailer, you’ll want to turn it to the “Off” position to prevent battery drain. When camping, you’ll select the “Both” or the appropriate battery position based on your system.
- Verify the connection: After switching, ensure the intended circuits are powered or disconnected by checking lights, appliances, or other relevant systems.
Battery Switch Safety Precautions
Working with batteries and electrical systems requires caution. Improper handling can lead to injury or damage to your equipment.
- Always disconnect the negative terminal first: When working directly with the batteries, disconnect the negative (-) terminal before the positive (+) terminal to prevent accidental shorts and sparks.
- Wear appropriate safety gear: Safety glasses and gloves are recommended when working around batteries, as they can release corrosive fluids or generate sparks.
- Never touch exposed wires or terminals: Ensure all connections are secure and insulated to prevent accidental shocks.
- Consult a professional if unsure: If you’re uncomfortable working with electrical systems, it’s best to seek the assistance of a qualified technician.
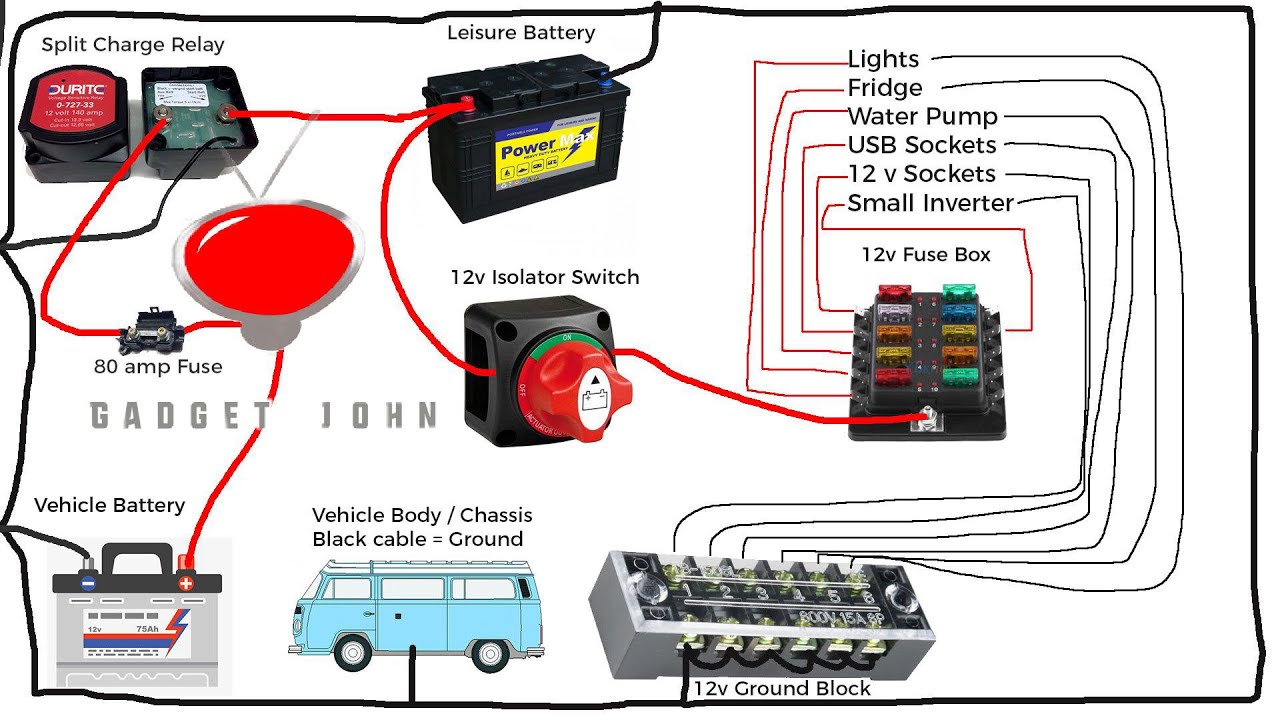
Connecting and Disconnecting Batteries: Battery Switch On Travel Trailer Function
Connecting and disconnecting your travel trailer’s batteries is a crucial aspect of maintaining your power system and preventing damage. Understanding how your battery switch works is essential for safe and efficient operation. This section details the typical wiring setup and the steps involved in switching between your house and chassis batteries.
A typical travel trailer battery system uses a battery switch to isolate or connect different battery banks. This allows you to selectively use either your house batteries (powering interior lights, appliances, etc.) or your chassis battery (powering the trailer’s brakes and other essential systems), or both simultaneously. Incorrect switching can lead to drained batteries or even damage to your electrical system.
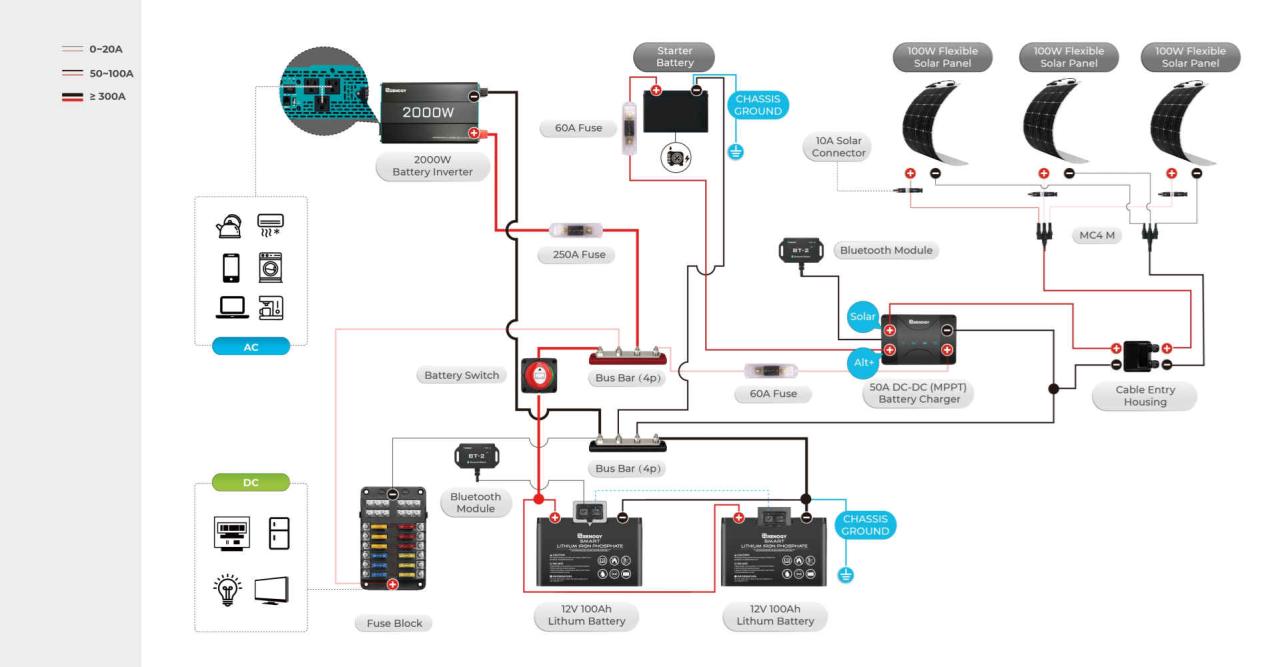
Typical Travel Trailer Battery Wiring Diagram
The following diagram illustrates a common wiring configuration. Note that variations exist depending on the specific trailer and its electrical system.
| Component | Description |
|---|---|
| Chassis Battery | Provides power for trailer brakes and other essential functions. Typically a single, deep-cycle battery. |
| House Battery(ies) | Provides power for interior lights, appliances, and other onboard systems. Often two or more deep-cycle batteries in parallel. |
| Battery Switch | A multi-position switch that allows you to select which battery bank(s) are connected to the trailer’s electrical system. Common configurations include a 2-battery switch (off, house, both, chassis) or a 1-2-Both-Off switch. |
| Positive (+) Bus Bar | A central point where positive (+) cables from the batteries and other components connect. |
| Negative (-) Bus Bar (or Ground) | A central point where negative (-) cables from the batteries and other components connect. Often directly connected to the trailer’s frame. |
| Converter/Charger | Converts 12V DC power from the batteries to 120V AC power for household appliances. Also charges the batteries when connected to shore power. |
| Load Center | Distributes power from the batteries to various circuits within the trailer. |
Connecting and Disconnecting Batteries Using a Battery Switch
The process of connecting and disconnecting your batteries depends on the type of battery switch installed in your trailer. Always refer to your owner’s manual for specific instructions. Generally, a 2-position switch will offer “Off,” “House,” “Both,” and “Chassis” positions, while a simpler switch might offer only “Off,” “House,” and “Both” options. Always ensure the switch is in the “Off” position before making any connections or disconnections to prevent accidental shorts.
Flowchart for Switching Between Battery Banks
The following flowchart illustrates the steps involved in safely switching between your house and chassis batteries. Remember to always consult your owner’s manual for specific instructions related to your trailer’s battery system.
(Note: A visual flowchart would be included here in a real-world application. This would show a sequence of steps like: 1. Turn off all loads. 2. Turn the battery switch to “Off”.
3. Select the desired battery bank (House, Chassis, or Both). 4. Turn on loads as needed.)
Troubleshooting Common Battery Switch Issues
Dealing with a malfunctioning battery switch in your travel trailer can be frustrating, leaving you without power when you need it most. Understanding the common problems and how to troubleshoot them will save you time and potential headaches down the road. This section will guide you through identifying and resolving some of the most frequent issues.
Battery switch problems often manifest in similar ways, regardless of the specific switch type. The root cause, however, can vary considerably. A thorough diagnostic approach is crucial to pinpoint the problem and effect a repair.
So, you’re prepping for a road trip? Awesome! First things first: make sure your travel trailer’s power is sorted. Check out this guide on the battery switch on travel trailer function to avoid any dead-battery surprises. Once that’s done, let’s talk tunes! For those who really care about sound quality, setting up an audiophile travel setup is totally doable, even on the road.
It’ll transform your journeys from simply driving to an immersive audio experience.
Common Battery Switch Problems and Their Symptoms
A non-functioning battery switch usually presents itself in one of a few ways. You might find that neither your house batteries nor your tow vehicle’s battery are charging properly, or that you’re unable to switch between battery banks. Sometimes, the switch itself might feel unusually hot or even show signs of burning or melting. These symptoms often indicate a problem within the switch mechanism, wiring, or even a faulty connection.
Causes of Battery Switch Malfunction
Several factors can lead to battery switch failure. Corrosion on the terminals is a very common culprit. This corrosion can impede the flow of electricity, leading to poor charging and reduced power. Loose connections, either at the switch itself or within the wiring harness, are another frequent cause. These loose connections can create intermittent power loss or complete failure.
Finally, the switch itself might simply fail due to age, wear, or overuse. In some cases, a short circuit within the wiring can overload the switch and cause it to malfunction or even melt.
Troubleshooting Steps for Battery Switch Malfunctions
Before attempting any repairs, always disconnect the negative terminal from your batteries to prevent accidental short circuits. Safety first!
A systematic approach to troubleshooting will help you quickly identify the problem. The following steps should be followed in order:
- Inspect the Switch and Wiring: Carefully examine the battery switch for any signs of damage, such as burning, melting, or corrosion. Check all wiring connections for looseness or corrosion. Pay close attention to the terminals and ensure they are clean and tight.
- Test the Switch Functionality: With the negative battery terminals disconnected, use a multimeter to check for continuity across the switch’s terminals in different positions. This will verify if the switch is internally functioning correctly. Refer to your switch’s manual for specific testing procedures.
- Check for Voltage at the Batteries: Use a multimeter to measure the voltage at each battery. Low voltage could indicate a charging problem unrelated to the switch, or a failing battery. Compare voltages between the house batteries and the vehicle battery to see if there is any inconsistency.
- Inspect Wiring for Shorts: Visually inspect the wiring harness for any signs of damage, such as fraying, cuts, or exposed wires. Use a multimeter to test for continuity and shorts within the wiring. A short circuit will cause a sudden drop in resistance and could indicate a problem that needs attention.
- Clean and Tighten Connections: Clean all battery terminals and switch connections with a wire brush and battery terminal cleaner. Tighten all connections securely to ensure good electrical contact. Applying dielectric grease can help prevent future corrosion.
Battery Switch and its Impact on Electrical Systems
Your travel trailer’s battery switch is the central control for your 12-volt DC power. Understanding how it works is crucial for managing your trailer’s electrical systems and preventing problems. This section will detail how the switch affects different appliances and what happens when it malfunctions.
The battery switch acts as a gatekeeper, determining which batteries (or neither) power your trailer’s systems. This significantly impacts the availability of electricity to your lights, appliances, and other 12V devices. A properly functioning switch ensures consistent power delivery, while a faulty one can lead to unpredictable behavior and potential damage.
Power Distribution with Different Switch Positions
The following table illustrates how power is distributed to various systems based on the battery switch position. Assume we have two batteries, Battery 1 and Battery 2, both 12V.
| Switch Position | Lights | Appliances (Refrigerator, Water Pump) | Other 12V Systems (Fans, Interior Lights) |
|---|---|---|---|
| Both Batteries On | Powered by both batteries (combined power) | Powered by both batteries (combined power) | Powered by both batteries (combined power) |
| Battery 1 On | Powered by Battery 1 | Powered by Battery 1 | Powered by Battery 1 |
| Battery 2 On | Powered by Battery 2 | Powered by Battery 2 | Powered by Battery 2 |
| Both Batteries Off | No power | No power | No power |
Effects of a Faulty Battery Switch
A malfunctioning battery switch can manifest in several ways, all impacting your trailer’s electrical performance. For instance, the switch might fail to connect to either battery, resulting in a complete loss of 12V power. Alternatively, it could create intermittent connections, leading to flickering lights or inconsistent operation of appliances. In some cases, a faulty switch can even cause a short circuit, potentially damaging batteries or other electrical components.
A common symptom is the inability to switch between different battery sources or to turn the power completely off, even when the switch is in the “off” position. This can drain your batteries quickly and leave you without power when you need it. In extreme cases, a severely faulty switch could even cause a fire hazard due to overheating or arcing.
Regular inspection and maintenance of the battery switch is therefore essential for safe and reliable operation of your travel trailer’s electrical system.
Maintaining and Replacing the Battery Switch
Your travel trailer’s battery switch is a crucial component, ensuring smooth power management. Regular maintenance prevents issues and extends its lifespan, while knowing how to replace it saves you time and potential frustration down the road. This section covers both maintenance and replacement procedures.
Battery Switch Maintenance Schedule
A simple maintenance schedule can significantly extend the life of your battery switch. Neglecting this vital component can lead to premature failure and electrical problems. This schedule Artikels essential steps for both routine inspections and deeper cleaning.
Yearly Inspection: Visually inspect the switch for any signs of corrosion, loose connections, or damage to the casing. Check for any unusual smells, overheating, or sparking. Tighten any loose connections. If you notice any problems, address them immediately.
Every Two Years: Disconnect the batteries and the switch from the electrical system. Use a wire brush or sandpaper to clean any corrosion from the terminals and the switch contacts. Apply a corrosion inhibitor, such as dielectric grease, to the terminals after cleaning to prevent future corrosion. Reconnect the batteries and switch.
Every Five Years: Consider a more thorough inspection by a qualified RV technician. They can check for internal issues that might not be visible externally.
So, you’re gearing up for a road trip? Awesome! First things first: make sure you understand your travel trailer’s power, check out this guide on the battery switch on travel trailer function to avoid any dead-battery surprises. Once you’ve got that sorted, it’s time to think about entertainment. For the ultimate mobile listening experience, consider building an audiophile travel setup – your ears will thank you for it! Remember to pack your chargers!
Replacing a Faulty Battery Switch
Replacing a faulty battery switch is a straightforward process, but safety precautions are crucial. Improper handling can lead to electrical shock or damage to your RV’s electrical system. Always disconnect the batteries before working on any electrical components.
Tools Required: Screwdrivers (likely Phillips and flathead), wire cutters/strippers, a new battery switch (matching the amperage and configuration of your existing switch), and optionally, dielectric grease.
Safety Precautions: Always disconnect the negative battery terminal first. Wear safety glasses to protect your eyes from sparks or debris. Ensure the area is well-ventilated. If you’re unsure about any step, consult a qualified electrician or RV technician.
Replacement Steps: First, disconnect the negative battery terminal, then the positive. Remove the old switch, carefully noting the wire connections. Install the new switch, ensuring the wires are correctly connected to the corresponding terminals. Apply dielectric grease to the terminals for corrosion prevention. Reconnect the positive battery terminal first, then the negative.
Test the switch to ensure it functions correctly.
Types of Battery Switches
Several types of battery switches are available, each offering unique features and benefits. The choice depends on your specific needs and the complexity of your RV’s electrical system.
Standard Battery Switches: These are the most common type, offering a simple on/off function for each battery bank. They’re relatively inexpensive and easy to install. They typically handle two battery banks (house and starting batteries).
Rotary Switches: These switches offer multiple positions, allowing you to select which battery bank to use or combine both. This provides greater flexibility in power management. They often incorporate a “both” or “off” position.
Automatic Battery Switches: These switches automatically switch between battery banks based on voltage levels or load demands. They’re more complex but offer convenient and efficient power management. These are typically more expensive than manual switches.
Combination Switches: These switches combine features of standard and rotary switches. They can have multiple positions for selecting battery banks and an off position, providing more control than a simple on/off switch. They can also be combined with a voltage sensing feature for more sophisticated power management.
Battery Switch and its Role in Preventing Battery Drain
Your travel trailer’s battery switch is your best friend when it comes to preventing unwanted battery drain. It acts as a master on/off switch for your trailer’s electrical system, allowing you to completely disconnect your batteries from the rest of the trailer’s components when not in use. This simple act can save you from a dead battery and a lot of frustration.Turning off the battery switch prevents parasitic drain, that small but steady current draw from things like clocks, carbon monoxide detectors, and even some poorly designed electronic components.
These small draws might seem insignificant individually, but over time, especially during extended periods of non-use, they can completely drain your batteries, leaving you stranded.
Importance of Turning Off the Battery Switch During Storage
Leaving the battery switch on while your travel trailer is in storage, even for a relatively short time, risks significant battery drain. This is especially true during colder months when battery performance naturally decreases. The longer the switch remains on, the greater the chance of a completely discharged battery, potentially leading to damage requiring costly repairs or replacements.
Turning the switch off ensures your batteries retain their charge, ready for your next adventure.
Best Practices for Preventing Battery Drain in a Travel Trailer
Preventing battery drain requires a multi-pronged approach. Here are some essential best practices to implement:
Regularly checking your battery levels and the condition of the battery terminals is key to early problem detection. Look for corrosion on the terminals, which can hinder proper charging and lead to drain. Cleaning them with a wire brush and baking soda paste, followed by a terminal protector, can greatly improve battery performance. If you notice excessive corrosion, it could indicate a more significant issue that needs attention from a qualified technician.
Furthermore, understanding your trailer’s electrical system is crucial. Identify any devices or components that might draw power even when turned off. This can involve investigating appliances and electronics that have low-level standby power consumption, like refrigerators or control panels. Disconnecting these devices when not in use or using low-power alternatives can significantly reduce parasitic drain.
Finally, consider investing in a battery disconnect switch with a key lock. This added security measure helps prevent accidental activation and protects against unauthorized access to your battery system. It provides an additional layer of protection to prevent drain, especially in situations where the trailer might be left unattended for an extended period.
Mastering your travel trailer’s battery switch is a simple yet powerful step towards a more enjoyable RVing experience. By understanding its function, performing regular maintenance, and troubleshooting effectively, you can prevent costly repairs and ensure reliable power for all your onboard systems. Remember, a little preventative care goes a long way in keeping your adventures on the road!
Questions Often Asked
What happens if I leave the battery switch on while the trailer is stored?
Leaving the switch on can drain your batteries over time due to parasitic draws from things like clocks and detectors. Always turn it off for extended storage.
My battery switch is stuck. What should I do?
Try lubricating the switch mechanism with a penetrating lubricant. If that doesn’t work, you might need to replace the switch.
How often should I inspect my battery switch?
Inspect it at least once a year, or more often if you notice any issues. Check for corrosion, loose connections, and smooth operation.
Can I use a different type of battery switch than what came with my trailer?
Yes, but ensure the replacement switch is rated for the correct amperage and voltage of your battery system. Consult a qualified RV technician if you’re unsure.
